Managed to get hold of a Pi Zero ? Here’s how to get started with it…
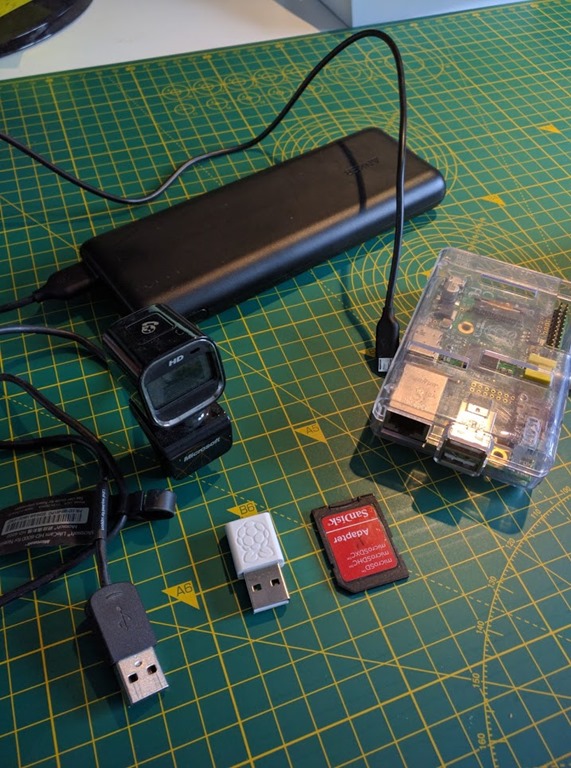
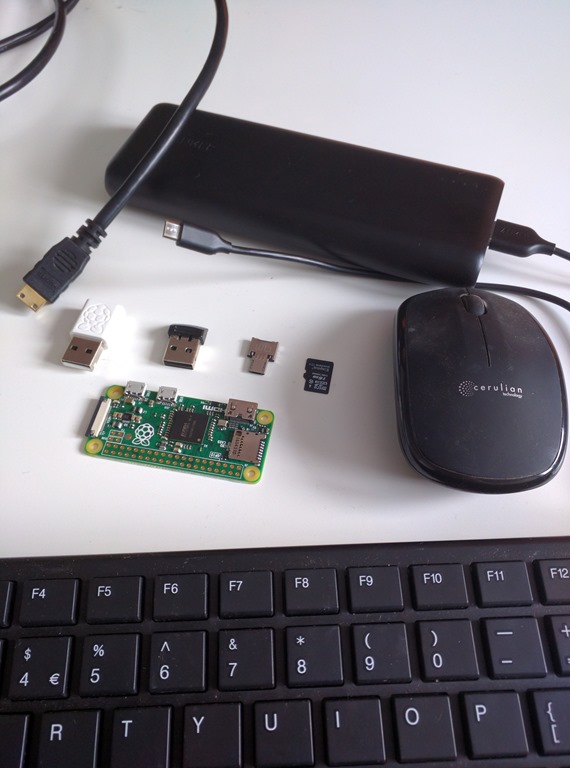
The Pi Zero only has a single micro USB port for connecting peripherals. That can make it a little tricking when trying to get things set up. There’s a few bits that you will need to go along with your Pi Zero in order to set it up and get it going :
- A way to power it (I use this portable battery power pack, but you can just use a charger plug, or computer USB port).

- A USB Wi-Fi dongle (I use the official one, but you can use any supported one).
- A micro SD card (£3.50 gets you a 16GB one these days, and for a couple of extra quid you can get 32 or 64 GB cards).
- A micro USB OTG adapter.
- A mini HDMI to HDMI cable.
- A wireless keyboard and mouse combo.
First up you’ll want to load the latest version of Raspbian on to your micro SD card (instructions here), then you’ll want to insert the micro SD card into your Pi Zero, making sure it’s pushed all the way in.


Next, connect up the micro USB OTG (On The Go) connector to the wireless keyboard/mouse dongle and insert that into the middle of the three connectors.


Lastly, for this bit, connect up the mini HDMI cable to the monitor and then connect the micro USB power cable.


The Pi Zero should now boot and you’ll see the text boot sequence log flashing by on the monitor. Depending on which version of Raspbian you are using you will either get a shell (text based console) or the screen will blank and then start up the desktop. If it boots to the desktop, then open xTerminal, if it boot to the shell then your good to go.
What we need to do now is to configure the Wi-Fi settings. To do this enter the following :
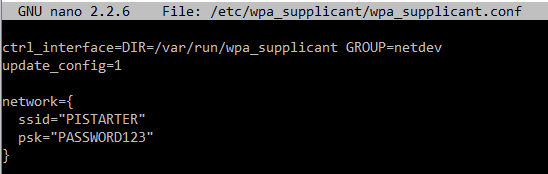
sudo nano /etc/wpa_supplicant/wpa_supplicant.conf
This will open the existing file which will likely only have 2 lines in it. Underneath those lines you will add your Wi-Fi details. It looks like this:
network={
ssid=”MYSSID”
psk=”mypassword”
id_str=”Home”
}
Replace MYSSID and mypassword with the actual values for your Wi-Fi network.
You can multiple of these ‘network’ sections if you have multiple Wi-Fi access points that your Pi Zero will access. Just make sure that each of them has a unique id_str.
When you have added your details hit CNTL+X, then Y and then ENTER to quit and save the file. Now you can shutdown the Pi Zero and we’ll do a little ‘plug and play’
When it has shutdown pull out the wireless keyboard/mouse dongle (it may leave the OTG adapter in there, no problem). Now plug in the USB Wi-Fi adapter to the OTG and make sure it’s plugged into the Pi Zero. Reapply power (unplug and plug in again) and it should boot up as usual, but will now automatically connect to Wi-Fi.

You can now access it from a remote machine via SSH. Open your SSH client and connect to raspberrypi.local (note: you need to have iTunes or other Apple software installed on the remote machine for it find the Pi using .local) Assuming all that has worked you’ll have a SSH connection to your Pi Zero and can tinker as needed. You can also, at this stage, remove the mini HDMI and run ‘headless’.
Great, we’re done, one Pi Zero set up with Wi-Fi, running headless, ready for some project.