In this project we are going to set up a FTP server using vsftpd. This is one of the fastest and most secure FTP server for Linux.
This will take us around 10 minutes to complete and is solely consists of typing commands to install and configure software.
By the end of this you will have a FTP server running on your Pi that you (and authorized others) will be able to connect to and upload/download files.
Lets get started…
We’ll need our Pi up and running and you’ll want to make sure we have all the latest updates, so open a terminal (or SSH connection to it) and make sure you’ve run the following commands:
sudo apt-get update
sudo apt-get upgrade
Now we’ll want to install the vsftpd package:
sudo apt-get install vsftpd
When this is complete (it takes a minute or two) we will have the software installed and need to move on to configuring it. To configure it we need to edit the vsftpd.conf file in the /etc/ folder. As this file is in the /etc/ folder we’ll need to be sudo to do that, so enter the following:
sudo nano /etc/vsftpd.conf
All the options are set to their defaults initially, but there are a few we want to change:
listen=YES
Setting this to ‘YES’ allows us to run the software as a daemon
#listen_ipv6=YES
This setting needs commenting out, or the service will fail to start. Simply add a # character at the beginning of the line
anonymous_enable=YES
Setting this to ‘YES’ allow other users to log in without have to enter a username / password first, but they will only have ‘read’ access (because of the following settings). Obviously, set this to ‘NO’ if you don’t want unauthenticated users being able to access your server / files.
write_enable=YES
Setting this to ‘YES’ (by removing the # character at the start of line) allows authenticated (not anonymous) users to upload files to our server.
anon_upload_enable=NO
Setting this to ‘NO’ (or omitting it from the configuration by adding a # character at the start of the line it is on) prevents anonymous users from uploading files – we don’t want any old user uploading files to our server (and maybe maliciously using up all the storage, or worse)
ftpd_banner=Welcome to the Pi Starter FTP server
You can set this to any text value and that text will be displayed to users when they successfully login. Make sure you remove the # character from the start of the line.
Excellent, we should now be fully configured and ready to start the ftp server, so we do that by entering the following command:
sudo service vsftp start
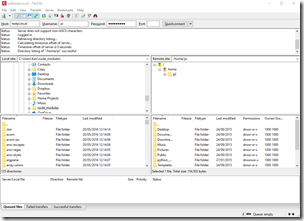
We should now have a fully working FTP server. You can test this out by running something like CuteFTP, or FileZilla on a remote machine and connecting to your Pi. Here’s an example of my FileZilla client connected to the Pi, and a Windows (PowerShell) command line connection to it


Hope this has been useful. Drop me a comment if you got it working.